Saturday, November 9, 2013


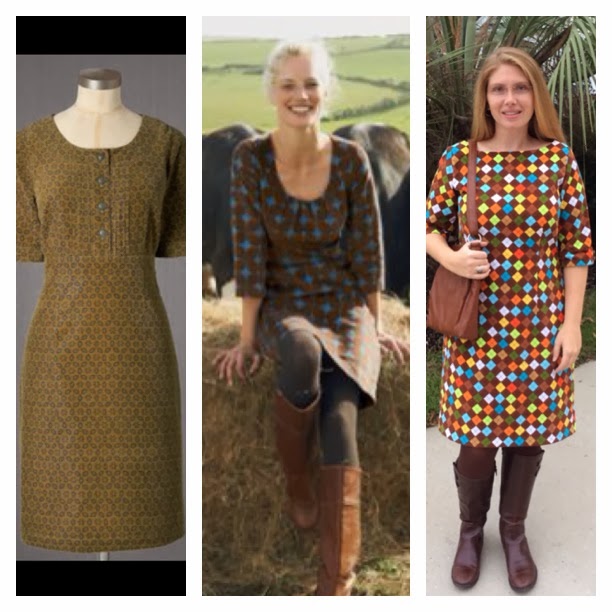
New Look 6145, View B


It seems like every time I promise "no more fabric," the evil geniuses fine folks at Fabric.com send me a sale email with irresistible items like my argyle cord and this border print sweater knit ($5/yd - Come On!!) You wouldn't know, because I haven't gotten around to actually sewing any of it yet, but I have a weakness for border prints. Keep an eye out around Easter for at least one of these to make it out of the stash.

So instead of starting on my intended project (another Rockstar Jacket), I took a few days to tackle my knit.

I chose a simple shift to showcase the design on the fabric. New Look 6145 stated that it was suitable for knits, although gave no suggestions as to how to proceed any differently with a knit. I do not have much experience at all with knits, but it seemed at least a few changes would be required. I made a few "educated" guesses and got to cutting.

The cutting took forever, as the design was not symmetrical and hard to line up. Plus the material was stretchy and slippy so that added an extra challenge. Once I finally got the material laid out, here are the pattern changes I made:


Pattern changes:

I increased the length of the hem, just a personal preference. I ended up not needing the extra length. This material was rather weighty and, combined with the stretch, this led to some sagging.. What I didn't take into account was that when I cut off all that extra fabric after hemming, the dress would then creep back up a little. This was not a huge problem, as I had hemmed the dress at the knee, but good to remember for the future. This did also help with the placement of the design. I felt the brown design started too low on my torso during early fittings even after careful pattern layout, but once the extra weight was removed, it sprang back closer to the desired location.  Again, good to remember for next knit project...  This pulling did also require an additional 5/8" adjustment at the shoulders to move the armholes, neck and darts back to the correct position. This was fine even after removing the excess weight.

I added extra allowance at the neck to allow room for a narrow hem since I had decided not to use a facing. I am not sure if this is how it should be done, but having never seen a sweater knit with a facing, I decided to leave it out. This ended up working out just fine.

I added a little extra at allowance at the waist and hip just in case the fit was snug. This turned out to be unnecessary as there was plenty of stretch in the material.   I ended up removing the extra material at the allowances, deepening my side seam by 5/8" under the arms and tapering to the waist and enlarging the back darts by a total of 1" at my first fitting.  I also removed an extra 1" at the top of the shoulder/sleeve, tapering to an extra 1/2" at the bottom of the armhole to correct some bunching and pull the shoulder seams up to the correct location.


Dress after fitting and marking


Changes to shoulder seams

Also, since the fabric had a 50% stretch, I decided to omit the zipper, center back seam and back vent that was called for in the woven pattern. I simply cut the back on the fold. (I did allow the pattern to hang over the fold by 5/8" since I would not need that seam allowance at center back). This worked out great.

Dress Front before fitting

Dress Side before fitting

Dress Front after fitting


Dress Side after fitting


Overall, I am pretty pleased with the dress. Construction (including complete basting of the bodice for fitting and marking and the tedious removal of all those seams) only took 2 days worth of naptimes and a couple of hours both nights. This may be record time for a sewing project at this house. The dress is also the most comfortable that I have made. I may do some research before another knit project as I'm not entirely thrilled with my seam allowances. They don't lie down nicely in some places, adding some unneeded bulk at the hip and occasionally bunching under the shoulder. Also, despite knowing I needed to use stabilizer when top stitching the bottom hem, I skipped it and ended up with the dreaded "wavy seam syndrome".  (More on WSS)  As much as the wavy hem bothers me, I have decided (at least for now) not to go to the trouble of ripping out all those tiny stretch stitches...  However, if I ever decide to take this on, I now have the perfect shirt:


Monday, October 28, 2013

New Look 6000 - This Year's Knockoff Boden Dress

New Look 6000 - This Year's Boden Knockoff


When I saw this argyle fine-wale corduroy on Fabric.com, I knew it had to be mine.  Once I received it, the design was a little busier than I had anticipated, so I chose a simple line for the dress.  This sheath from New Look has several variations for sleeve and neck.  I used version E and the only changes that I made were to:

1. use an invisible zipper vs adding a flap (mostly because I already had the invisible zipper on hand.)


2. change the cuff - the pointy cuff looked funny on my muslin, so I opted to square off the ends and have them overlap, topped off by decorative buttons.


3. top-stitch the hem.  The pattern called for edge finish and slip stitch, but the fabric was so thin that I worried my stitching would show.  I could have finally tried the blind hem stitch on my machine, but I was in a hurry, so I just top-stitched and am happy with the result.


With regard to alterations, I cut a smaller size than usual (turns out I have been cutting 1-2 sizes too big on past dresses...) and just reduced the seam allowances slightly at waist and hip at side seams and reduced the back seam to 3/8 all the way down. (I made no changes to darts.) This way I was able to avoid all of the usual work that is involved when the shoulders and neck are way too big... I still ended up taking in a fair amount at armholes to reduce bulk around armholes and eliminate some bagginess across the back.


I did my best to cut the fabric in a way that would allow for the design to be straight L to R and top to bottom. (Took forever...) Due to curves and darts in the pattern, I could not always line up the pattern so that the argyle fit together perfectly at the seams, but I am fairly pleased with the results, especially at the sleeve cuff where the pattern flows from sleeve to cuff pretty nicely. 


I would definitely make this dress again.


Wednesday, October 9, 2013

Cross Stitch for a Dear Friend

Cross Stitch Housewarming Gift


The text is a line from Sam Walter Foss' The House by the Side of the Road


The House by the Side of the Road

THERE are hermit souls that live withdrawn in the place of their self-content;
There are souls like stars, that dwell apart, in a fellowless firmament;
There are pioneer souls that blaze their paths where highways never ran-
But let me live by the side of the road and be a friend to man.

Let me live in a house by the side of the road where the race of men go by-
The men who are good and the men who are bad, as good and as bad as I.
I would not sit in the scorner's seat nor hurl the cynic's ban-
Let me live in a house by the side of the road and be a friend to man.

I see from my house by the side of the road by the side of the highway of life,
The men who press with the ardor of hope, the men who are faint with the strife,
But I turn not away from their smiles nor their tears, both parts of an infinite plan-
Let me live in my house by the side of the road and be a friend to man.

I know there are brook-gladdened meadows ahead, and mountains of wearisome height;
That the road passes on through the long afternoon and stretches away to the night.
But still I rejoice when the travelers rejoice and weep with the strangers that moan,
Nor live in my house by the side of the road like a man who dwells alone.

Let me live in my house by the side of the road, where the race of men go by-
They are good, they are bad, they are weak, they are strong, wise, foolish - so am I.
Then why should I sit in the scorner's seat, or hurl the cynic's ban?
Let me live in my house by the side of the road and be a friend to man.

Sam Walter Foss


 Getting Started - used old sampler as pattern, first time using waste canvas


Removing Waste Canvas - this was a chore.  Best result came from lightly moistening with a spray bottle, then using the eye of the needle to separate threads before pulling out individually.  Also recommend (carefully) cutting away excess waste canvas for easier removal.  Beware the instruction that states "Then simply pull the threads to remove..."


 Back of Piece after removing Waste Canvas


Finish and Framed (the framer added a pouch on the back to hold a copy of the poem)


Materials:
Fabric is Osnaburg
Embroidery floss, hoop and needle
Waste Canvas


Friday, June 21, 2013

Simplicity Project Runway 2444

Simplicity 2444


For this dress, I finally took the time to make a muslin and am glad that I did.  I ended up cutting one size smaller than the pattern called for and still had a fair amount of fitting at shoulder and under the bust.  I took up an extra 1 1/4" from the front shoulder and an extra 5/8" in back.  Then I cut down the back of the neckline 5/8" to account for these changes (to keep the neckline from ending up too far up the back of my neck).  I also had to reshape the neck facing to fit the new neckline shape.  I enlarged the front darts under bust and took up extra material under the arms as well. I also needed to take up the waist seam at the front to correct an unattractive dip.

After the fit changes, I also lengthened the sleeve to the elbow, omitted the sash and giant bow, added a 4" hem, bound the seams, sewed down skirt pleats and omitted pockets to reduce bulk, and added thread chains for the purchased belt and bra/slip straps.
 
 
Here is my muslin.  Please forgive the Pepto Bismol print - it was $1.50/yd at Walmart.  You can see in the first two pictures that the waist dips a little in the front, creating an unattractive barrel look at the midsection.  I took up the waist seam a little between the front darts to correct this and create a straighter waist seam. You can also see the excess material at neck and the bulkiness below the belt.  Again, this I corrected by removing the side-seam pockets and sewing down the pleats.  


Here is the in-progress dress, showing my weird (but effective) front bodice darts, the skirt pleats being sewn down and the arduous process of easing the fullness out of 4" of hem on this full skirt...  Next time I will listen closer when my Mama Leah says "I don't believe I'd put a 4" hem on that full skirt..."


And here is the final dress, as modeled by my dress form Gladys.


McCalls 6303 and Vintage Simplicity 4755: Madras Sunsuits


McCalls 6303 and Vintage Simplicity 4755 c. 1950s


McCalls 6303


This sundress from McCalls seems to run a little large.  I had already decided to move the buttons from the yoke to the straps (and to round out the top of the yoke just to look nicer since it would now be on the outside) to accommodate for letting out as M grows.  I am glad that I did as this pattern ran big and I ended up taking up several inches of strap.  I was able to just tuck them under, but I did add a second button on each side to help hold them in place.  The bloomers are huge.  I did what I could with the elastic in the casings, but they are still way big.  Luckily, they cannot be seen under the dress since it is pretty long right now as well.  I did leave an opening in my casings and an extra inch or so of elastic so that I can let out the legs and waist next year.


Simplicity 4755 - 1953


I am in love with this pattern.  It was still a little big for C, but I couldn't wait until next year, so I did what I could with alterations so that she could wear it this year and, hopefully, next.  I took some tucks at the back neckline, which aren't beautiful as the neckline is pretty stiff due to a layer of gathers stuffed under the bias binding.  However, they are mostly disguised by the ruffles and the busy material. I also reduced the elastic in the bloomers and the back of the skirt.  The sash helps too and the 4" hem will allow for letting out.  This patchwork madras was a little difficult to sew precisely due to all the bumpy seams, so I gladly ditched the iron and gauge for this project and did a lot of eyeballing.  Aside from fit alterations, the only other change was to self-line the sash (vs narrow hem), as the seams on the madras would have been unattractive when visible.


 This beautiful patchwork madras was purchased from Three Chickadees Textiles


Saturday, February 23, 2013

Two Hour Apron

We have a yogurt problem at our house.  Ever since Molly demanded to begin self-feeding, it is everywhere.  As chief laundress, this is adding to my laundry efforts and I'm over it already.  It is time for some new aprons.

Here I am tracing my favorite store-bought apron onto the back of some left-over Christmas paper.  The gridlines on the back were very helpful since I was too lazy to pull out the yard stick.


It doesn't get more homemade than a wrapping paper pattern and canned goods for pattern weights, huh?


Originally, I had not planned to line these aprons, but the denim that Caroline picked was pretty thin and I wasn't sure it was up to Molly's messes, so instead of 4 aprons, we ended up with two self-lined.  I was not as careful as I should have been when cutting, so the lining of Apron 2 had to be pieced together.  Pictures of that later.

Once I had cut out all of the pieces, I changed my needle to a big #16 denim needle and stitched up side and shoulder seams of the right side and lining fabrics (separately).  I considered adding another layer of flannel inside for extra absorbency but decided that two layers of denim should be enough for most of our daily messes.  Here is the back view of Apron 1 before lining.


Next I pinned right sides to linings (wrong sides together) and topstitched around edges and armholes.  This denim was bad to fray, so I would have had to staystitch even had I not been adding a lining.


Next I trimmed seam allowances and added bias tape.  If you know me, you are probably familiar with my affection for store-bought bias tape.  So you can imagine my excitement when I found DENIM bias tape!  While I probably didn't need the #16 needle for my lightweight denim (even with two layers), I did need it for this heavy bias tape, especially at the ends.  I will also admit that the ends where my bias tape overlaps are plain homely (partly due to being slack and not pinning the bias tape before sewing, partly due to the thickness of the denim bias tape).  I frowned about this for a while and then reminded myself that these aprons were being made for the express purpose of being soaked in yogurt and spaghetti sauce, so I got over my ugly finishing and moved on.


The last step was to add some Velcro at the back.  Again, if these were for a fancy project, I may have taken the time to change my threads, but blue was good enough for me this time.  The whole apron took about two hours and two yards of 58" denim yielded two self-lined (or four unlined) aprons.  It took just over a whole pack of bias tape per apron.

I mentioned that I had to get creative with the lining for Apron 2.  Here's how I pieced together the last of my scraps.


And here is Molly breaking in her new apron :)  Mmmmmmm!!!